KEENCUT
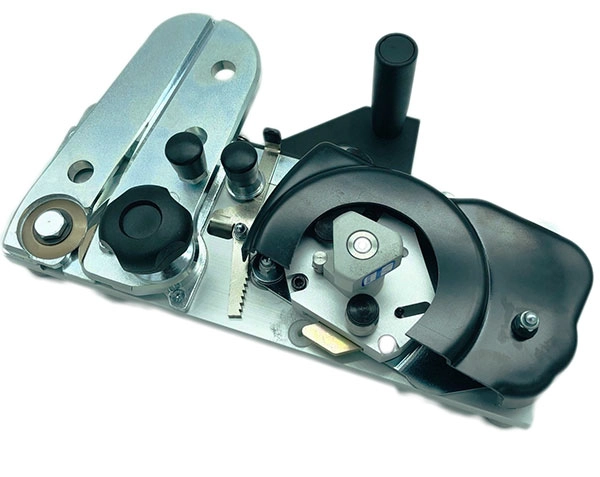
SteelTrak cutter head assembly
theme600
theme600


KEENCUT
SteelTrak cutter head assembly
SteelTrak cutting head complete with C2 steel/aluminium composite cutter and multi cutter rotating turret arrangement.
You Must be Logged in to Add the Item to your Cart.
How to replace the SteelTrak cutting head
Tools required:
Allen (hex) key 4 & 5mm
13mm spanner/wrench
5mm spanner/wrench or grips
Worn scouring pad
Cleaning cloth
Petroleum jelly (Vaseline)
30cm (1’) strong string to anchor balance weight (optional)
0.15mm (0.006") feeler gauge or a stout piece of paper
What to do
NOTE: Two people required and it is important to read and understand the instructions fully before starting work
Preparation:
Close the clamp
Using the 4mm and 5mm Allen (hex) key loosen the four screws shown by four full turns
Raise the existing cutting head up to head height. Check the new head can be placed loosely onto the tracks at chest height, if not undo the four screws another turn until it does. Remove new cutting head and place aside.
To remove the existing cutting head loosen the top and bottom handle bracket screws by four full turns using the 4mm Allen (hex) key. Do not loosen the middle screw.
Whilst person A holds onto the cutting head main handle, person B loosens the two spring bar fixing screws by four full turns using the 5mm Allen (hex) key. The cutting head should now come loose and may want to travel up the machine, do not let go of the handle. Try to move it off the tracks, if it will not release undo all four screws by another turn or two until it does.
With person A still holding the cutting head, person B (with gloved hands) hold onto the steel balance weight cable whilst it is released from the rear of the cutting head plate using a 5mm Allen (hex) key.
Use the strong string to tie the end of the balance weight cord to an adjacent support arm whilst the track is cleaned.
Using a worn scouring pad with a small amount of petroleum jelly rub the two guide bars to remove any debris and stains, wipe with a clean cloth and finally apply a very thin smear of petroleum jelly.
Using the 4mm and 5mm Allen (hex) key loosen the four screws on the new cutting head by four full turns. Check the new head can be placed loosely onto the tracks, if not undo the four screws another turn until it does.
Remove cutting head from the tracks and secure the balance weight cable onto new cutting head. Position the track rollers on the tracks and fully tighten the four screws.
The steel bar with the oval holes, the spring bar, holds the two adjustable track rollers and is designed to flex a small amount, like a spring and add tension so the guide track rollers are pressed onto the tracks. It is important that the tension is set correctly, use a 0.15mm (0.006") feeler gauge or a stout piece of paper to measure the gap under the Spring Block as shown. If the gap is too large or too small the adjacent track roller will need adjusting.
When the correct gap appears hold the Shaft still and tighten the locking nut.
Finally check the cutting head runs the full length of the machine and when the utility blade is engaged it is automatically released at the bottom of the machine.